Thu 12 December 2019
Basic GitLab CI setup to make a PC as a C/C++ build machine
What is this about? Basic GitLab CI setup by using Shell Executor to compile C/C++ project on Windows
When working on a C/C++ project, sometimes you might want to do a full build to check your functions against your teammate's latest works. But as we all know, compiling is a CPU intensive task and it can easily freeze your workstation. This is the moment when an idle programmer can go for a sword fight.

Original image from xkcd
Preferably, we want to keep on coding while the code is flowing out of our brain. So, what can we do? You may think about incremental compilation by pulling your teammate's works from upstream repository to your new local branch and compile that for checking, then switch back to your working branch again. That would work well in many situations. Anyway, there will be a situation when you and your teammate want to do early integration tests or just want to reserve your precious CPU threads while working on another task.
Employing CI (Continuous Integration) to solve this kind of problem has become more generic in software development workflow and it is a good option here as well. In this post, I am going to introduce you to the GitLab CI and demonstrate a basic setup utilizing an idle PC as a build machine.
How it works
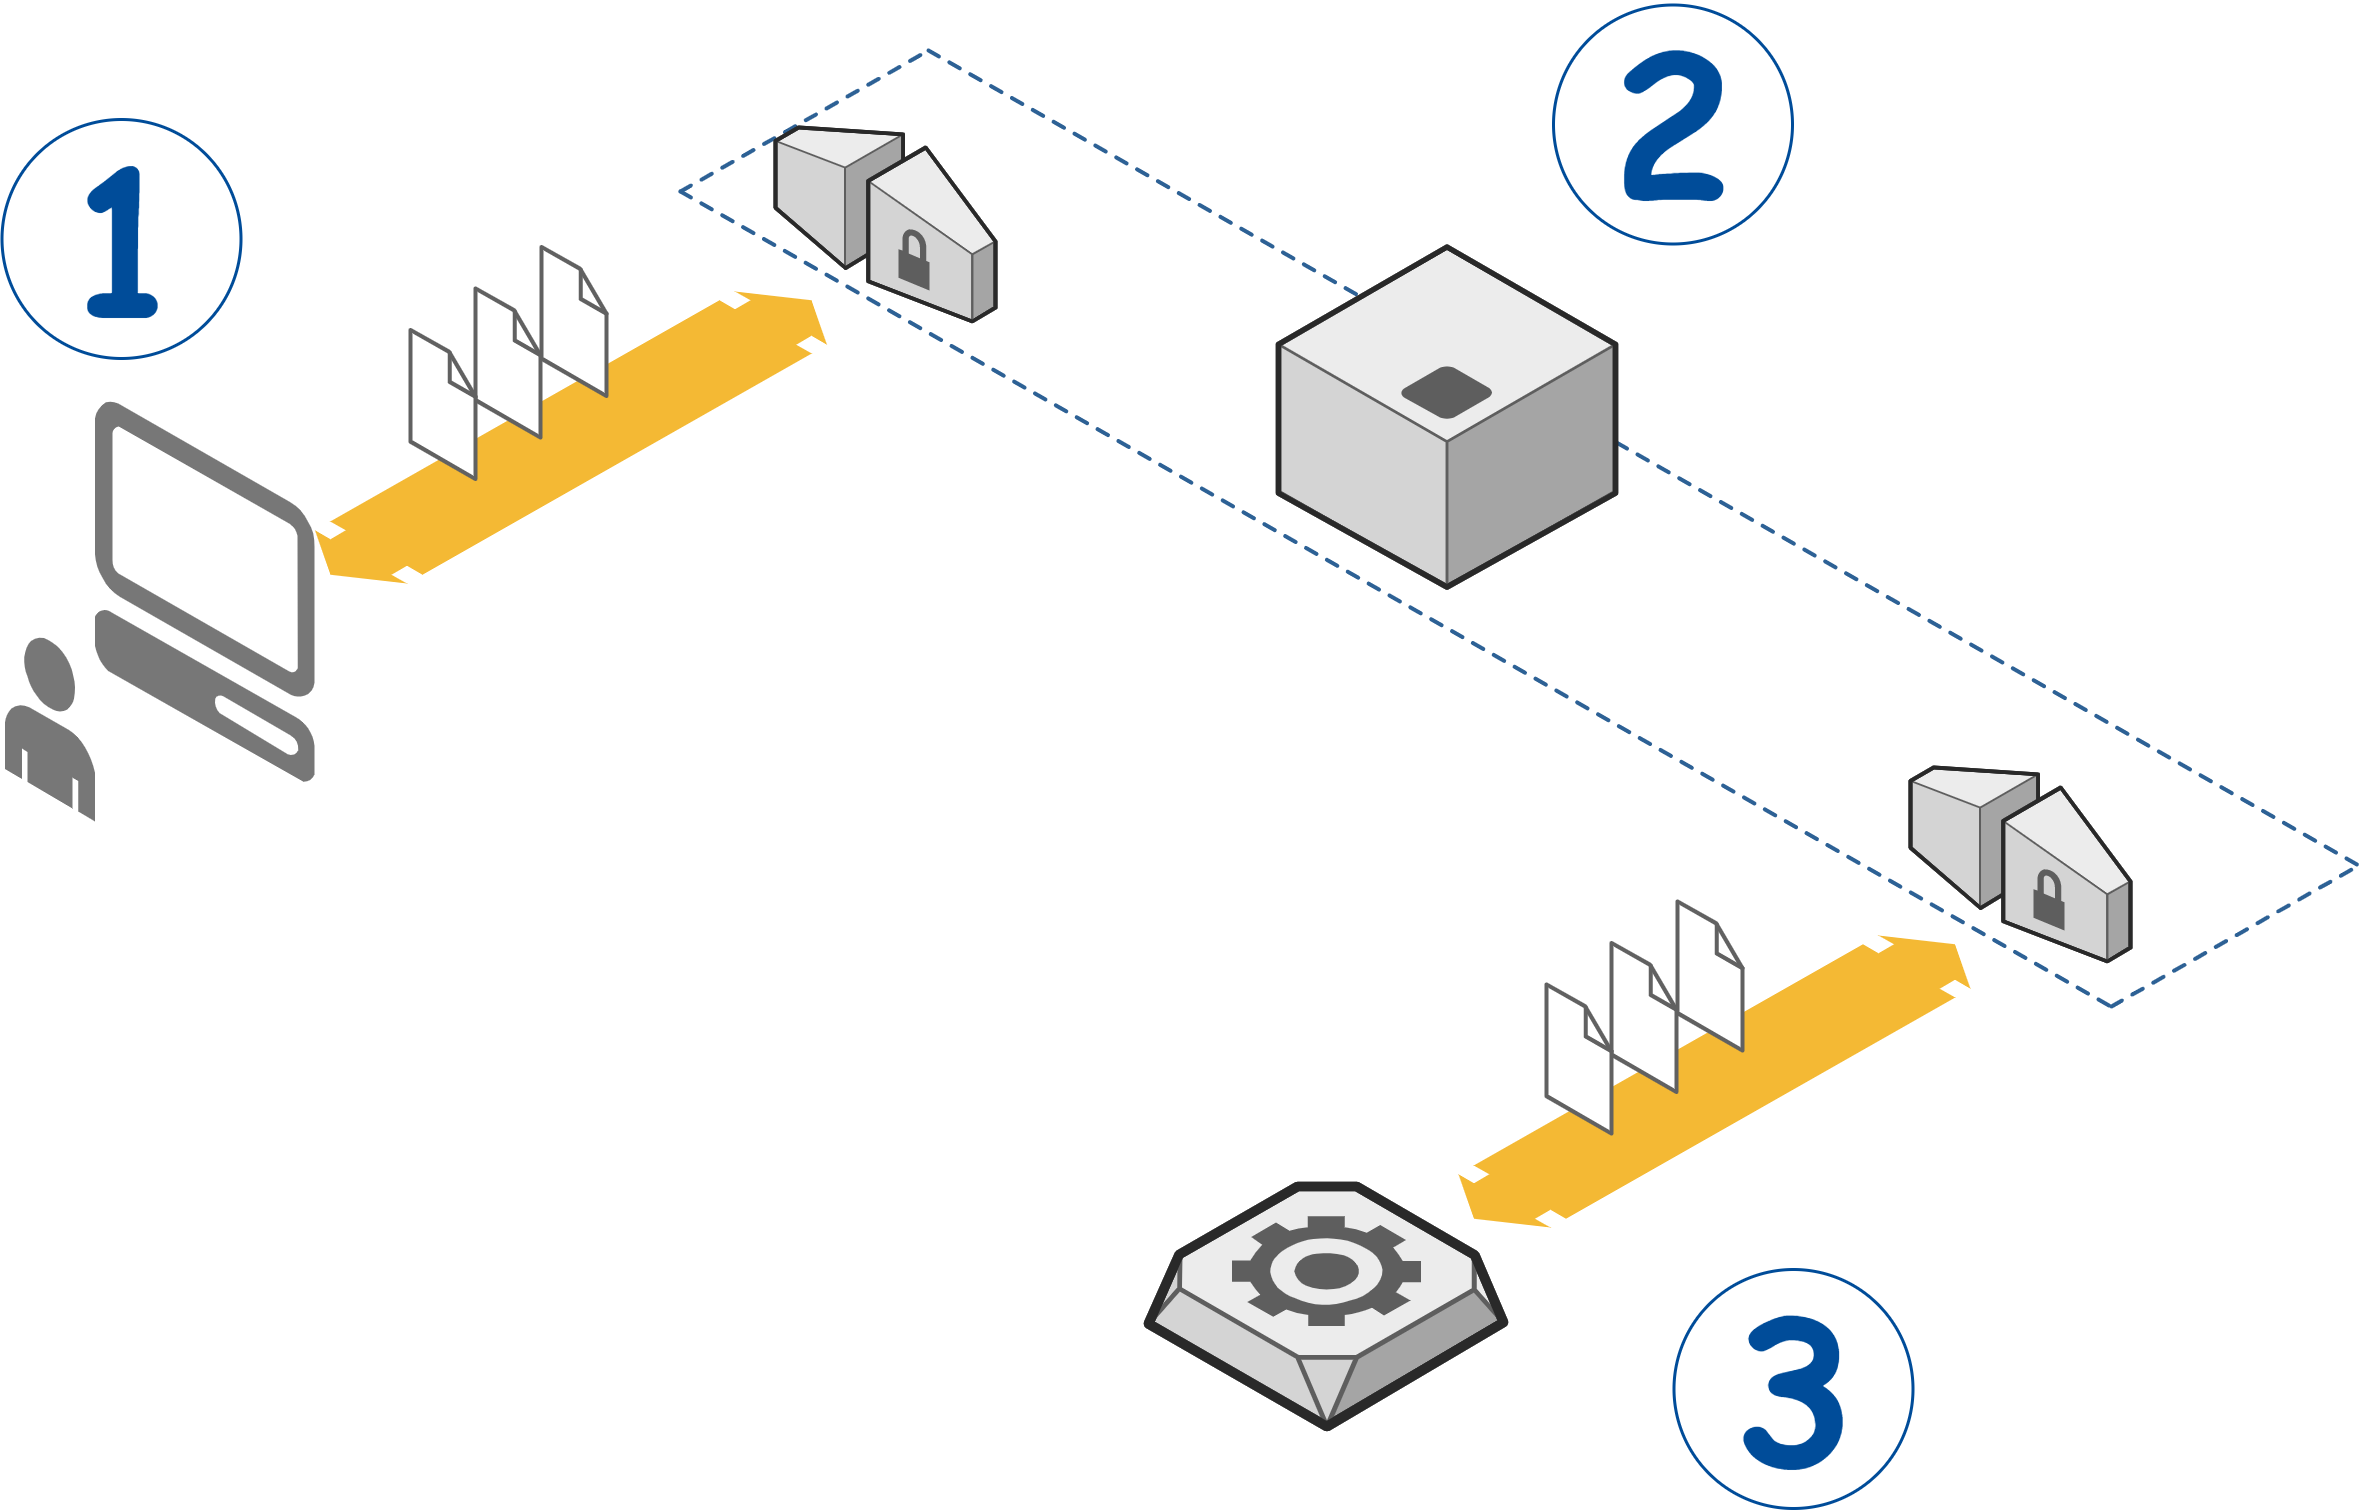
There are 3 components related to our pipeline configuration; Developer workstation, GitLab.com services and our build machine.

The numbers above represent
- Developer workstation
This workstation must have a git client for submitting source code to GitLab.com - GitLab.com
What is GitLab.com? If you don't know what it is, then this post will not be a benefit for you. Actually, instead of using GitLab.com, you may use your self-managed GitLab instance on-premises or in the cloud. it is all up to you. - Build machine
Our source code will be compiled here. This machine needs a setup to be ready for compiling C/C++ project
The process can be triggered at developer workstation (Number 1) by using a git client to submit source code to GitLab.com (Number 2) which our pipeline configuration will be executed. The source code will be passed to the build machine (Number 3) for compiling further. This is just a basic pipeline configuration. We may use this as a base for setting up a more advanced build farm.
The repo
It depends on your git workflow but for this guideline, we use a repo as development repo which separated from the production repo. This will help the developer to do early integration tests or mess around with git branches with no impact to the production repo's history log. I also prepare an example repo (Visual Studio 2017 C/C++ project) which you may fork it to your account for easy following. Here is the link -> gitlab_runner_windows.
Configuration
There are 6 steps we need to do for this pipeline configuration. Step 1, 2 and 3 are on the developer workstation. Step 4, 5 and 6 are on the build machine.
1. Prepare your GitLab repo
You need a GitLab repository. This repo must contain your C/C++ project and a powershell script that will run on the build machine as a start point. You may fork the example repo for quick initializing. gitlab_runner_windows
2. Edit powershell script
This is quite a simple powershell script. The main purpose is to setup necessary environment variables and then call MSBuild.
You can find an example script "build.ps1" in the repo
$ErrorActionPreference = "Continue"
Write-Output "Running build on $Env:computername ..."
& {
    # environment variables
    $PathMSBuild = "D:\Microsoft Visual Studio\2017\Community\MSBuild\15.0\Bin"
    $PathSolutionFile = $env:CI_PROJECT_DIR + "\helloci\helloci.sln"
    Write-Output "PathMSBuild = $PathMSBuild"
    Write-Output "PathSolutionFile = $PathSolutionFile"
    # append path to env
    $Env:path += ";" + $PathMSBuild
    & "MSBuild" $PathSolutionFile "/p:Configuration=Release"
    if(!$?) { Exit $LASTEXITCODE }
}
if(!$?) { Exit $LASTEXITCODE }
3. Edit .gitlab-ci.yml
Along with the powershell script in the repo, we need a configuration file called '.gitlab-ci.yml'. This file is a GitLab-specific configuration file for CI, it tells GitLab CI how to perform tasks. Below is our simple configuration that calls build.ps1 from the previous step.
build:
  stage: build
  script:
    - ./build.ps1
4. Setup gitlab-runner
gitlab-runner will be set up on the build machine. It is an executable that works closely with GitLab.com services to provide remote automate tasks. GitLab has already provided a nice tutorial. Here is the link for installing GitLab Runner on Windows. It is a very simple copy-paste installation that after downloading you just put it in your path and we are ready to go.
Before we can start the runner, we need to register it to the repo first. Run "gitlab-runner register" to register the runner. Follow the steps here to register gitlab runner on Windows
During registration, you can follow the steps from the link. There are only 2 things need to be mentioned here. The Token and the Executor.
- Token
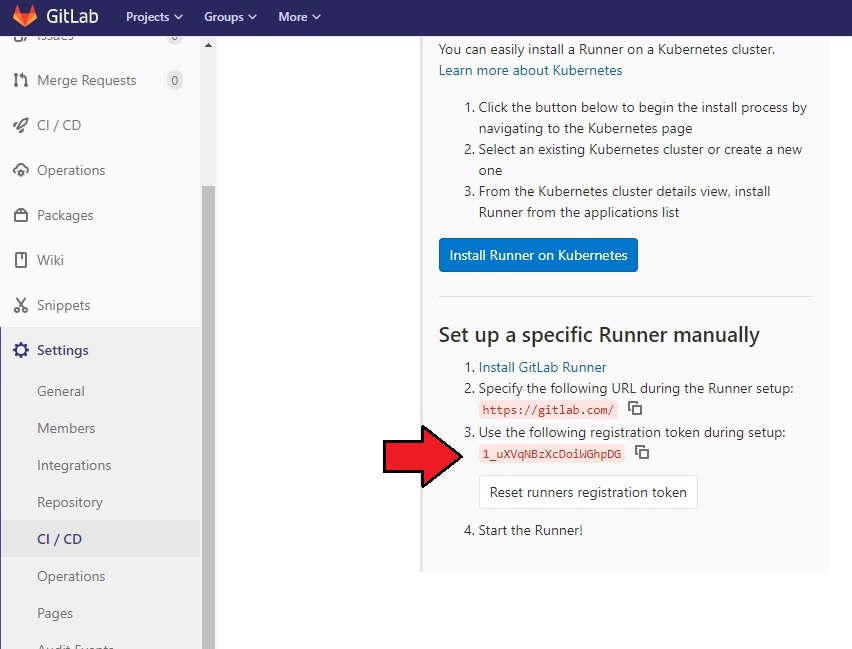
GitLab uses a token for identifying your runner registration to the repo. gitlab-runner will ask you for the gitlab-ci token which you can find it at your repository's settings. Go to your repo at gitlab.com, find Settings -> CI /CD and then Expand the Runner section, The registration token is in "Set up a specific Runner manually" part.

After entering the token, the gitlab-runner will connect to GitLab.com and register the runner to the repo. You should see the "Registering runner... succeeded" message.
- Executor
The executor is what the runner used to perform CI, You can find more info here. For our case, we use the shell executor.
All configuration will be in "config.toml" file at the same folder where gitlab-runner.exe is. You also need to edit this file as the following step.
5. Edit config.toml
We need to specify "listen_address" in config.toml or pass it as a parameter when running the runner. The listen_address is an IP address and Port on the build machine that the runner will listen to. The final editing file should look similar to this
concurrent = 1
check_interval = 0
log_level = "debug"
log_format = "text"
listen_address = "0.0.0.0:9002"

[session_server]
    session_timeout = 1800
    listen_address = "0.0.0.0:9001"

[[runners]]
    name = "Windows10Builder"
    url = "https://gitlab.com/"
    token = "c43p8xzUx3WXKnu_rdwd"
    executor = "shell"
    shell = "powershell"
    [runners.custom_build_dir]
    [runners.cache]
        [runners.cache.s3]
        [runners.cache.gcs]
You may notice that the token in config.toml is different from the token you just enter. gitlab-runner automatically negotiates a new token with GitLab.com services. So, we just keep it like that.
6. Run the runner
From this point, we are ready to run the gitlab-runner. Open your command prompt and enter
gitlab-runner run
Leave the prompt open and that is all we need to do on the build machine. Make sure that you see the below messages. You will also notice that the message "Checking for jobs" keep repeating itself. It is like a heartbeat ping message that you may use to confirm a connection between the runner and GitLab.com services.
msg="Dialing: tcp gitlab.com:443 ..."
msg="Checking for jobs... nothing" runner=c43p8xzU
msg="Feeding runners to channel" builds=0
That is all for our configuration. We will do a verification on the next.
Verifying
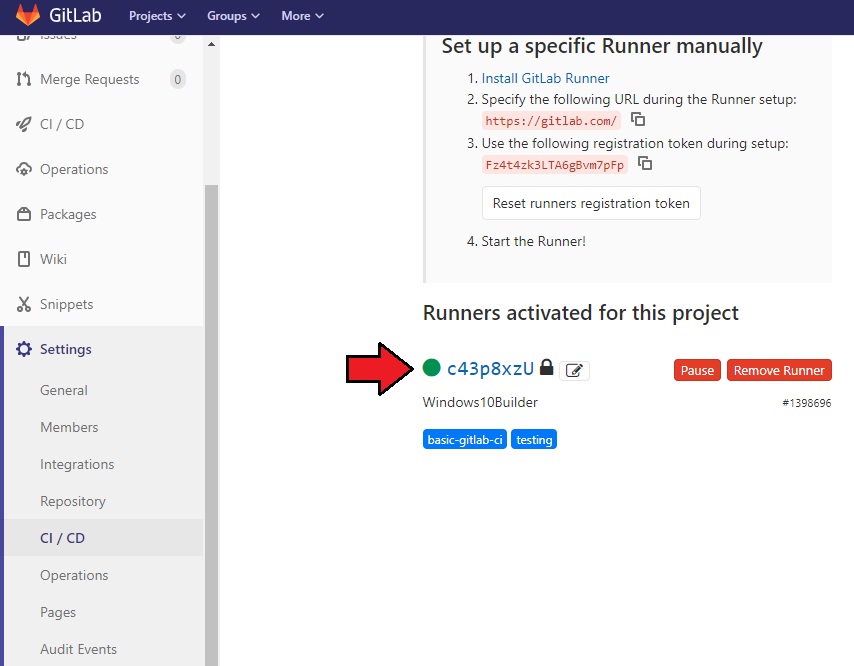
- Go back to GitLab.com and go to CI / CD settings where you can find your token. Check that your runner is green.

- Try to push your commit to the repo. The runner should fetch your code to the build machine and execute build.ps1 automatically. Check the left side navigation CI / CD which you can find rich job information there.
Troubleshooting
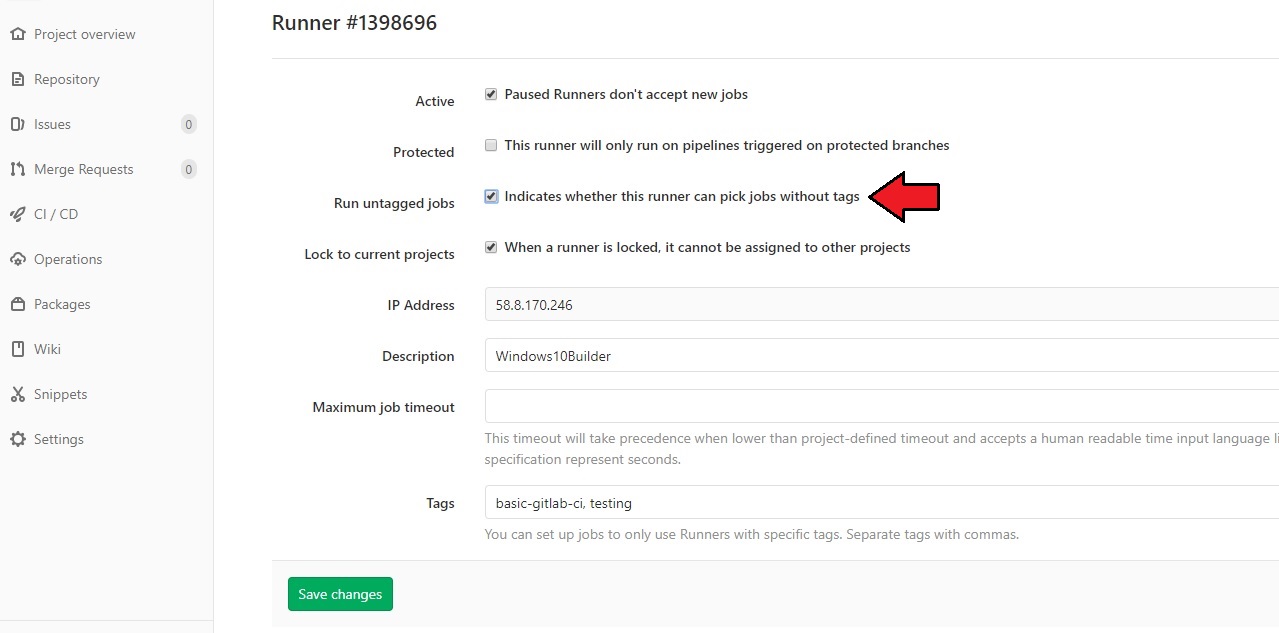
- Sometimes, you may need to edit the runner setting on GitLab.com CI / CD Settings to make it works by ticking "Indicates whether this runner can pick jobs without tags". I found this glitch and this is a workaround. See the following images

Tick "Indicates whether this runner can pick jobs without tags"

-
If you see "Job failed (system failure): Failed to start process: exec: \"powershell\": executable file not found in %PATH%", make sure you have "C:/Windows/System32/WindowsPowerShell/v1.0" in your PATH variable
-
Simply try to restart your runner if something goes weird
On a side note
There is an awesome feature of gitlab-runner, the metrics. You can simply find it at http://
Conclusion
This post is a basic approach of GitLab CI configuration you may use it as a guideline for your specific tasks. CI / CD becomes more popular in modern software development. It is a tool that obviously can help software development projects to deliver faster/better results. Anyway, adapting this tool to your workflow may punish your team members. How to implement it is the most important thing in my humble opinion.